Create images and make them travel the world using HTML5, SVG, Canvas and Javascript

In the past months we had the opportunity to work on finding the best solution for composing and manipulating vector images in the context of an HTML5 web application for smart phones, tablets and desktop browsers.
The scope of the web application we developed (PicMood, available on the Appsfuel marketplace) is to publish to Facebook an image that represents your mood; the image is composed of a character (you can customize expression, hair and clothes), optionally a pet, a background scenario (that you can customize using a photo as background) and a short text; the generated image can be modified with visual filters before being published on Facebook in high definition.
From this flow we can derive a list of technical issues that we had to face to complete the application:
- Find the right solution for dynamically composing and rendering the character mood, the pet and the scenarios.
- Composing the scene with the different elements.
- Adding a photo to the scenarios.
- Applying visual filters to the image.
- Generating an image from the composed scene.
- Posting the generated image to Facebook without using any intermediate server side persistence.
1. SVG is the solution
After many tests using PNG elements for character composition we determined that the best technology to adopt is the SVG format. In fact this graphic format can be generated directly from most of vector graphic software as for example Adobe Illustrator® and it is natively interpreted by almost all modern browsers.
So instead of converting each character variation into a separate PNG file, we drawn all the characters and scenarios using Adobe Illustrator and we defined variations in different hidden layers of a single Illustrator file. Exporting the file as SVG it becomes immediately available in the HTML page, maintaining the original structure and properties; all the composing elements can then be manipulated via JavaScript (we used the jquery.svg.js and the jquery.svgdom.js JavaScript library written by Keith Wood for that). As the SVG is a vector graphic we have the advantage that the composed image is scalable in dimensions maintaining a light size in KB.
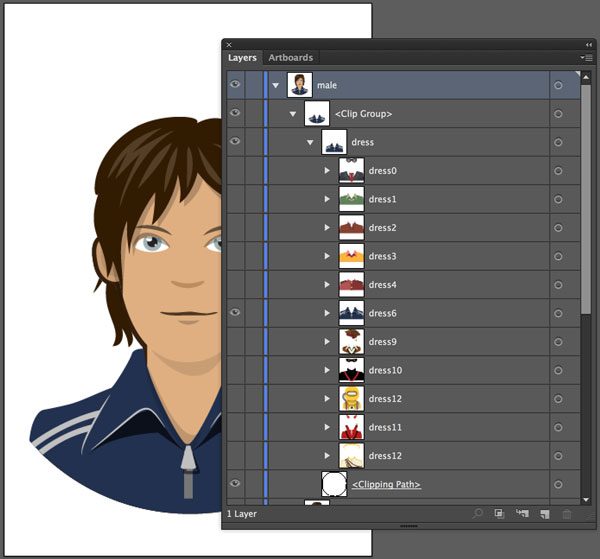
The application gets the available characters file path from a configuration JSON file and injects them into the HTML DOM; the SVG is rendered using nested TAGS available traversing the DOM structure itself.
<svg version="1.1" id="male" x="0px" y="0px" width="640" height="350" viewBox="0 0 640 960" enable-background="new 0 0 640 960" xml:space="preserve" display="">
<defs>
    <circle id="mask" cx="324.18" cy="514.516" r="370.67"></circle>
</defs>
<clipPath id="mask_1_">
    <use xlink:href="#mask" overflow="visible"></use>
</clipPath>
<g id="body" clip-path="url(#mask_1_)">
    <g id="male-body">
    ...
    </g>
</g>
</svg>
This workflow may seem just a detail but it is actually a revolutionary detail: in web development we use a direct, structured output from the illustrator / graphic designer. We are as close to the assets source as we can get, as we manipulate the vector source directly in JavaScript.


The above images are two SVG rendered as source of IMGs
All this has become possible thanks to the fact that in HTML5 it is possible to use SVG inline, and this feature is widely supported (http://caniuse.com/svg-html5). This means being able to manipulate the SVG elements via JavaScript just like any other element on the page. Here you can find the “older” embedding methods: http://www.sitepoint.com/add-svg-to-web-page/.
2. Composing the scene
As the SVG has a well defined XML structure we can easily compose a scene from different and separated SVG elements.
So we have the main character, the pet and the background scenario managed separately in the flow and after all recomposed into an unique SVG element. You still can manipulate each element in the composition separately via Javascript.

And this is a composed SVG from the above elements
3. Take a photo and use it in your SVG composition
Another requirement of the app is to let you use a photo as background of the scene.
Fortunately the latest HTML5 mobile API allows you to access the camera directly from HTML, returning a Base64 image (http://en.wikipedia.org/wiki/Base64) as value.
The procedure is quite simple; you just need to add a “multipart/form-data” FORM with an input type ‘file’:
<form name="fileupload" method="post" target="targetfile.php" enctype="multipart/form-data" style="position: absolute; top:-1000px">
   <input id="getPhoto" type='file' name="upload" value="get a photo" >
</form>
Instead of opening the file chooser window as it happens on a desktop browser, the mobile browser (both iOs and Android) will let you choose to open an image from your gallery or take a new one with the camera.
Once we get the photo in DOM we just need to attach a “change” event to the input “file” (that is fired once the image is available as value of the input itself) and use the FileReader API (https://developer.mozilla.org/en-US/docs/Web/API/FileReader) to convert it to a Base64 data.
Oh my God… you did rotate your camera taking the photo!…
Unfortunately the image data returned from the iOs mobile camera is conditioned by the phone orientation (portrait or landscape) and the right orientation is stored into the image METADATA. The browser interpreter does the right thing but when you inject the photo into the SVG it doesn’t… So if you take a photo using your phone in portrait, the image you are going to insert into the SVG composition will be rotated by 90 degrees. Murphy’s law is always lurking…
After quite some research we found the canvasResize.js library written by Goker Cebeci that relocate bit to bit the image data based on the orientation expressed in the photo METADATA (using the exif.js library written by Jacob Seidelin). Here is the code to get the photo stream and return it as Base64:
      $('#getPhoto').on("change", function (event) {

            var files = this.files;
            var acceptedTypes = {
                'image/png': true,
                'image/jpeg': true,
                'image/gif': true
            };
            var file = files[0];
            if (window.FileReader && acceptedTypes[file.type] === true) {

                var reader = new FileReader();

                picMood.start_loader("Loading photo");

                reader.onload = function (event) {
                    var image = $("<img/>").attr("src", event.target.result);
                    image.on("load",function(){

                        canvasResize(file, {
                            width: 1280,
                            height: 0,
                            crop: false,
                            quality: 100,
                            //rotate: 90,
                            callback: function(data, width, height) {
                                $("#photo",$('#sceneTypes')).remove();
                                picMood.add_image_to_svg(data, width, height);
                                picMood.stop_loader();
                            }
                        });
                    })
                };
                reader.readAsDataURL(file);
            }
        });
Now that we have the Base64 image data we can easily create an SVG image element having as source the Base64 data and appending it to our scene…
…What?!… You really want to scale and move the image into the frame?!
Yes… a new requirement of the app is to let you scale and move the image into the SVG background frame to get the best shot according to the composition. That means we had to catch all the swipe and drag gestures to manipulate the scale and the position of the image. Unfortunately there’s no SVG based light library to do that.
We found the solution looking on what library is available for Canvas and we found the image-touch-canvas library written by Romain Beaudon; a lightweight library that makes it easy to attach gestures events to a Canvas element to scale and move its content. So we pass through an intermediate view where we append the image into a Canvas to let the image repositioning, then we convert it again to a Base64 image data source and finally we insert it into the SVG.
4. Applying visual filters a la Instagram
Another requirement of this app is to apply visual filters to the composition similarly to what you can do on Instagram®. For this scope we had to convert the SVG composition into a Canvas element as it is the best environment for working on pixel base variations.
Looking on the web we found the right library for that: canvg written by Gabe Lerner.
This library is an SVG parser and renderer to Canvas:
canvg('canvas_'+svg._svg.id, svg.toSVG(),{renderCallback:function(){
            callback(cnv);
     },
     ignoreDimensions: true
});
Once we have the corresponding Canvas object we can use the excellent PaintbrushJS library written by Dave Shea that lets you apply image processing to modify the appearance.
Ok, the work is almost done!
Our composition has been transformed from a multi-element SVG to a single Canvas element that we can manipulate bit by bit.
Next step is to convert it to an image that we can share on Facebook!
Fortunately the Canvas API has a native method to transform the Canvas object into a Base64 data source: canvas.toDataURL(“image/jpg”). Applying this method we can set the result as “src” of an image element:
var image = $(container).find("img");
var b64img = canvas.get(0).toDataURL("image/png");
var img = $("<img id='img_"+canvas.get(0).id+"'>");
$(container).append(img);
img.attr("src",b64img);
Now we just have to send it to Facebook… But how?!
5. Send a Base64 image to Facebook
Facebook is an excellent persistence layer: scales, costs nothing, has a popular and usable user interface 🙂 So we are saving our images in Facebook, creating via API a dedicated album.
Facebook Graph is a rich and well designed API (https://developers.facebook.com/docs/graph-api/) and has a JavaScript SDK (https://developers.facebook.com/docs/javascript/gettingstarted/). Reading and writing via Ajax JavaScript calls is not a problem but for pictures, which is large and binary data. In the classical web, this data is sent to the server using multipart posting, but this way you are losing consistency with other calls, don’t have the full set of API parameters available and if you are also posting non ISO values you may have encoding problems if not passed in the querystring.
Use the blob!
Now HTML5 has a blob object (https://developer.mozilla.org/en-US/docs/Web/API/Blob) which is ideal for saving our image and sending it to the server in a perfectly standard fashion.
Blob is in theory widely supported, but as happens in the boundaries of HTML5 for mobile (e.g. another example of immature HTML5 tech is audio for mobile, on which we experimented in detail, see our report here http://pupunzi.open-lab.com/2013/03/13/making-html5-audio-actually-work-on-mobile/) not everything works as expected.
In the evolution of HTML5, the first JavaScript Blob object was through BlobBuilder (https://developer.mozilla.org/en-US/docs/Web/API/BlobBuilder) which is now deprecated.
Now if you use the new Blob object works practically everywhere on the desktop with updated browsers – does not work on Safari 5. The problem is with mobile, where feature detection will tell you that the object is supported and instantiatable, but actually in some cases does not work. Which also proves that you should not trust too much feature detection :-).
It works this way:
First we convert the Base64 dataURI to a blob
function dataURItoBlob(dataURI,mime) {
    var BASE64_MARKER = ';base64,';
    var base64Index = dataURI.indexOf(BASE64_MARKER);
    dataURI = dataURI.substring(base64Index + BASE64_MARKER.length);
    var byteString = window.atob(dataURI);
    var ia = new Uint8Array(byteString.length);
    for (var i = 0; i < byteString.length; i++) {
        ia[i] = byteString.charCodeAt(i);
    }
    return new Blob([ia], { type: mime });
}
Then we post it via the Facebook graph:
var blob = dataURItoBlob(imageData,mimeType);
var fd = new FormData();
fd.append("access_token",token);
fd.append("source", blob);
fd.append("message",msg);

if(placeID && placeID.length>0)
   fd.append("place",placeID);

var request = $.ajax({
   url:'https://graph.facebook.com/'+picMood.fb_album_id+'/photos',
   type:"POST",
   data:fd,
   processData:false,
   contentType:false,
   cache:false
});

request.done(function(){
    if(typeof callback == "function")
        callback();
});
request.error(function(e){
    console.debug(e.name + ": " + e.message);
    //on error fall back to the hacked method
    post_fb_multipart();
});
If the browser doesn’t support the Blob then it will fall back to the multi part form hack:
function post_fb_multipart() {
   var encodedPng=imgD.substring(start, strLength);
   imgD = Base64Binary.decode(encodedPng);
   var boundary = '--ThisIsTheBoundary1234567890';
   var formData = '--' + boundary; formData += 'Content-Disposition: form-data; name="source";
   filename="picMood_' + new Date().getTime();
   formData += 'Content-Type: ' + mimeType ';
   for (var i = 0; i < imgD.length; ++i) formData += String.fromCharCode(imgD[ i ] & 0xff);
   formData += '--' + boundary; var xhr = new XMLHttpRequest();
   xhr.open('POST', 'https://graph.facebook.com/' + picMood.fb_album_id + '/photos?access_token=' + token + '&place=' + placeID + "&message=" + encodeURIComponent(msg), true);
   xhr.setRequestHeader("content-type", "multipart/form-data; boundary=" + boundary);
   xhr.sendAsBinary(formData);
}
The situation at the time of writing is as follows:
| Browser / Operating System | Blob support |
| Stock on Android (4.0.3, 4.0.4) | Does not support blob; it supports BlobBuilder in theory (via feature detection), but actually it doesn’t work. So you have to use the old style, via multipart posting. |
| Safari on ios 6 | The blob object is supported (via feature detection) but.. it doesn’t’ work and also BlobBuilder is no more supported… So you have to use the old style, via multipart posting. |
| Chrome on Android (v. 30) | Supports Blob and works fine. |
| Safari on IOS7 | Supports Blob and works fine. |
Conclusions
In this article we demonstrate how it is possible to create an app that composes various SVG elements manipulating them by scaling, moving, switching their layers to show or hide parts, inserting a photo as background, adding visual filters and, finally, posting the resulting image to Facebook without the need of any server side persistence.
The result is a pure HTML5 application that can be used stand alone indifferently on devices or on desktop browsers.
If you want you can try yourself the PicMood app by visiting the Appsfuel marketplace and “install” it on your smart phone or tablet.
If you want to contact us:
@pupunzi (Matteo Bicocchi)
@ppolsinelli (Pietro Polsinelli)
Hope this article can help you on finding solutions for your developments. We’ll be happy to revise the contents on your suggestions.
Resources:
jquery.svg.js and the jquery.svgdom.js
A JavaScript library for SVG manipulation.
Written by Keith Wood
canvg
A JavaScript SVG parser and renderer.
Written by Gabe Lerner
image-touch-canvas
A light JavaScript library to scale and move elements inside their Canvas.
Written by Romain Beaudon
PaintbrushJS
A JavaScript library to apply visual filters to images using Canvas.
Written by Dave Shea
canvasResize.js
A JavaScript library for client side image resizing that solves the iOs camera orientation issue.
Written by Goker Cebeci
FileReader API
https://developer.mozilla.org/en-US/docs/Web/API/FileReader


Good Work Pupunzi!
I like the code presentation:
The switching options and the nice colors.
[…] In the past months we had the opportunity to work on finding the best solution for composing and manipulating vector images in the context of an HTML5 web application for smart phones, tablets and … […]
[…] In the past months we had the opportunity to work on finding the best solution for composing and manipulating vector images in the context of an HTML5 web application for smart phones, tablets and desktop browsers.The scope of the web application we developed (PicMood, available on the Appsfuel marketplace) is to publish to Facebook an image that represents your mood; the image is composed of a character (you can customize expression, hair and clothes), optionally a pet, a background scenario (that you can customize using a photo as background) and a short text; the generated image can be modified with visual filters before being published on Facebook in high definition.From this flow we can derive a list of technical issues that we had to face to complete the application:Find the right solution for dynamically composing and rendering the character mood, the pet and the scenarios.Composing the scene with the different elements.Adding a photo to the scenarios.Applying visual filters to the image.Generating an image from the composed scene.Posting the generated image to Facebook without using any intermediate server side persistence. […]